Pages

Showing posts with label grid technique. Show all posts

Friday, June 1, 2012

Happy Nature


This week at JAI we have a photo for inspiration.

JAI120_InspirationalPhoto

I was inspired by the colours of the crates on the wall.  I thought they were close to wisteria wonder and pool party.  I was also inspired by their rectangular shapes and that they were housing a collection of sorts.

IMG_4373

The photo inspired me to use my grid technique again.  If you’d like to see a tutorial on how it’s done just click here.

Ingredients :

Stamps : en Francais, French foliage, perfectly penned, kindness matters, nature walk

Card : black, crumb cake, white

Ink : stazon, pool party, NQN, wisteria, eggplant, crumb cake

Other : Nothing (AMAZING!)


Please take a look at what the rest of the design team have come up with this week and let the photo inspire you to create something beautiful.


Kathy

Tuesday, May 10, 2011

Family Nature


Just thought I’d show you another challenge from the Splitcoast Stampers Creative Crew.

With this one you have to choose a layout and make a male and female card with it, while keeping the “antique” theme for this month.

CCREW0511HF, CreativeCrew, SUO or SUM - Holiday/Seasonal Focus -- Family Time! Mom's and Dad's days are here, but let's not forget about the Grandmas and Grandpas either. This month we're doing a his & hers challenge. Choose one layout and make a masculine card and a feminine card!

I decided to use Nature Walk and my grid technique to make a male card.  This one was for my Brother in law’s birthday.  I distressed this one quite a lot to try to make it more “manly”. I used the music notes wheel on the crumb cake and really scrunched it and then sponged crumb cake on it.

IMG_1119 

Ingredients : 

Stamps :  Nature walk, music notes, teeny tiny sentiments, sanded

Card : vanilla, naturals ivory, crumb cake, espresso

Ink :  crumb cake, espresso, river rock

Other :  linen thread, mini library clip, sponges, post its, big shot, lots of tags


Then this one is using the same layout but was for my Mum for Mother’s Day, so a “girly” version. For the challenge you didn’t need to use the same stamp set, but I love my new Nature Walk set so much I just had to!  


IMG_1133

Ingredients :

Stamps : Nature walk, very vintage, teeny tiny sentiments

Card : Espresso, vanilla, pink pirouette

Ink : pip, crumb cake, espresso

Other : linen thread, espresso thin taffeta, word window punch, modern label punch, pearls, pip button, big shot, square scallop die, sponges, post its


Kathy

Tuesday, January 25, 2011

vintage pink

This is another card  made for my daughters’ violin teacher using the Stampin’ Celebration challenge of chocolate and flowers.
IMG_0796

I used the same technique I used for the grid cards again but this time I made a rectangular mask and left the centre blank and then stamped the Because I Care flower into this space.
Ingredients :
Stamps : Because I care, music notes wheel. very vintage wheel
Card : very vanilla, choc chip, naturals ivory
Ink : PIP, choc chip
Other :  PIP taffeta ribbon, sponge, antique brad

I hope she likes it!

Monday, January 24, 2011

Grid Technique Tutorial

Well, I’ve had quite a few people comment on my cards this week (which is wonderful!!!!)  They’ve also been asking questions about this grid technique that I’ve been talking about and wanting to know how to do it.  So I thought I would do a little tutorial on how I made my blue butterfly card.
Firstly, I must say that I got the original idea from the Splitcoaststampers resources section it is called Retiform Grid Technique, you can see the tutorial here
I liked the look of it but I wanted mine to have more of a collaged background look.  I also wasn’t that keen on the “angles” on the card and wanted mine to be more rectangular. I looked up the meaning of Retiform and it means: net-like in form; having criss-crossed lines.  Which I’m not sure mine is anymore.  There is also a tutorial on Splitcoast for Collage stamping see here.  I hadn’t looked at this one before I made my card, some people had commented that they liked my “collaged” background and so I had a look at this tutorial too to see if I had actually said the wrong technique.  Anyway mine is perhaps a combination of the two things?
I hope you find my little tutorial helpful.  I’ll continue to call it Grid technique but WHO KNOWS what it really is?  I’m confused myself.

Step 1
IMG_0811

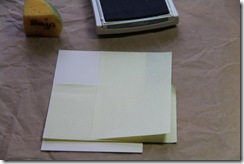
Firstly I get my sponge.  I thought I’d show you this in the photo too.  I buy the pack of 3 stampin up sponges and cut them into 4 pieces (therefore you’ve got 12 sponges) and I write the colour on the side using a sharpie permanent marker so that the colours don’t get all messed up. I sponge with the rounded part.
Cut very vanilla card to size. I used 2 post it notes (I used the long ones but you can use the smaller or just sheets of copy paper) to mask off a rectangle.  I line up the post its with the edge of the card too to keep the lines straight. 

Step 2
IMG_0813
Rub the sponge on the baja blue pad and then rub along the edges of the post its. The sponging will be half on and half off the post its. I also sponged up into the rectangle very lightly.

Step 3
IMG_0815
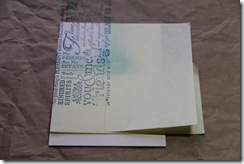
Stamp whatever you like onto this rectangle.  I used NQN, a darker shade of the sponging colour.  You could use the same colour though for a more subtle look or a different colour entirely.  I used the Friendly Words wheel.

Step 4
IMG_0816
Remove the post its and this is what you have.

Step 5
IMG_0818
Next you need to cover the area you just stamped with the post it. Then I used another post it to make a longer rectangle under the stamped one, aligning edges so the lines will be straight.

Step 6
IMG_0819
Sponge the lines again as before.

Step 7
IMG_0820
Stamp this rectangle. I used Elements of style.

Step 8
IMG_0821
Remove post its and this is what you have.

Step 9
IMG_0822
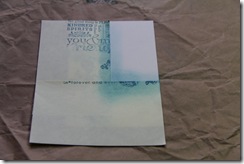
Cover this over and make another rectangle and sponge the edges again.

Step 10
IMG_0823
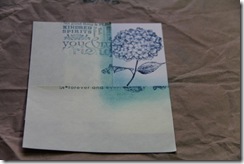
I stamped Because I care in this one.

Step 11
IMG_0824
Again cover this up and sponge again.

Step 12
IMG_0825
Used the music notes wheel. And didn’t do a great job either, doesn’t matter though because I am tearing off the bottom section of this for my card.

Step 13
IMG_0827
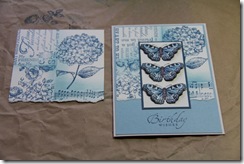
Tear edge and admire your work!

I hope that all made sense.  If not just email me, I’m happy to answer any questions.
Kathy

Sunday, January 23, 2011

Pretty chocolate for you

I’ve had such a good week. Sleeping in, crafting, playing with the kids and I’ve also won 2 awards for my cards!  I was a top pick at Just Add Ink for my blue butterfly card and I was also a Cut Above winner at Paper Players for my Here for You card.  I was so excited to be chosen by these two great sites.
I have been making more cards using the grid technique to give to my daughters’ violin teacher.  I’ve made them all slightly differently, please leave me a comment and let me know which one you like best.
I found another challenge site this week too which looks fun.  It’s called Stampin’ Celebration and the challenge for this week is chocolate and flowers.  I decided to use the grid technique and use pip and choc chip and of course flowers.

IMG_0801

This one has a more vintage feel to it than the other cards I think.  I used pip to sponge onto the vanilla and stamped in choc chip. This is similar to what I did with the other cards, but this time I also wheeled over the entire piece with the very vintage wheel using crumb cake.  It is subtle, but made the card more “vintagy” and lovelier I think.

Ingredients :
Stamps : Because I care, elements of style, friendly words wheel, very vintage wheel, all a flutter
Card : pink pirouette, very vanilla, crumb cake, shimmery white
Ink : pip, choc chip, crumb cake, stazon
Other : aquapainter, pip taffeta ribbon, mini glue dots, hodgepodge hardware, scallop trim border punch, sponges

Thursday, January 20, 2011

Here for you

Well I’ve been wasting time this week, crafting and checking out my favourite blogs and finding lots of lovely new ones as well!  I found a challenge site called The Paper Players and they have a colour challenge this week. Their design team have created so many stunning cards, it inspired me to try these colours together too. 
 image
I thought I would try the grid technique again but this time use 2 colours Baja Breeze and River Rock.  I also stamped the blossoms from Elements of Style onto watercolour paper, coloured them and cut out a couple to attach to the tag.

IMG_0786

My daughter’s violin teacher had to go to hospital for knee surgery just before Christmas, she is back home now and we might go and visit her next week if she’s up to visitors.  I thought I might make a couple more cards using the grid technique and give them to her as a little gift from us.  The last time I gave her a few cards it made her so happy, she said they were so beautiful and hopefully she’ll really like these grid ones too.
Kathy

Ingredients :
Stamps : Elements of Style, music notes wheel, friendly words wheel, very vintage wheel, vintage vogue, friends 24-7
Card : very vanilla, baja breeze, naturals ivory, rose red, watercolour paper
Ink : baja breeze, river rock, rose red, stazon
Other :  pearl, embroidery thread, river rock ribbon (retired) mat pack, aquapainter, big shot, lots of tags, wide oval punch, sponges

Tuesday, January 18, 2011

Monochromatic Flutter

The challenge at Just Add Ink this week is Monochrome and I love monochromatic cards so just had to play along with this one.  Monochromatic means using tones of the one colour, but in card making I assume it means to use one plus a neutral.  I did cheat slightly though because I used black to stamp the butterflies and coloured their bodies with choc chip.  I’d still class it as a monochromatic card though – Hopefully they do too!  I decided to use my favourite Stampin Up colour, Baja Breeze and its darker shade Not Quite Navy with vanilla as my neutral.

Picture 158


I used the grid technique on the background piece using baja to sponge and NQN to stamp the images.  I stamped the butterfly in choc chip on the vanilla piece but also stamped them onto shimmery white with stazon and then watercoloured them only using Baja, NQN and a touch of choc for the bodies.  Then I cut them out and stuck them on top of the vanilla piece using mini glue dots.  I realised that you can really bend the shimmer white card and it gave the butterflies a lot of extra dimension.  Plus it gives them a pretty shimmer.
So as you can imagine after doing all that it was not a quick and easy card.  But the hardest part about it was tearing my background grid piece!  Stamping 411 have another wonderful sketch challenge this week and I decided to incorporate both of these challenges into the one card.  It meant that I had to tear my background though and it was hard for me to do it because I really liked how it was.  Anyway I am very happy with the end result I think it actually looks really nice torn now, thanks Stampin 411 for making me do it!  I just finished it off with a birthday sentiment which I stamped with NQN and clear embossed.

Ingredients :
Stamps : because i care, all a flutter, elements of style, music notes wheel, friendly words wheel, sincere salutations
Card : NQN, very vanilla, Baja breeze, naturals ivory, shimmery white
Ink :  baja breeze, NQN, stazon, choc chip, versamark
Other :  mini glue dots, aqua painter, sponge, clear embossing powder

I was having trouble rolling the wheels straight and evenly and I remembered a tip I’d read once and decided to give it a try.  Instead of holding the handle and pushing away or toward yourself, you put the handle down on the table and roll it back.  Amazingly I found it heaps easier and it worked really well for me.  Unfortunately I can’t remember who had this tip to give them credit, but next time your “wheeling” give it a try!
Kathy