Pages

Friday, April 28, 2017

3 Balloons Kitty

I have a card for CC Designs to share today.
This little cutie is 3 Balloons Kitty.
She is so sweet isn't she?!


I used the Make a Card #2 and #5  Dies to cut the ovals.
And I used the Pinky Rectangles Die for the the pinked edge.

The papers are from My Girl by My Minds Eye.
I even cut the sentiment out of one of the pieces.  I love this pad

Copics used :


W 00, 1, 3
Y 11, 13, 15
RV 21, 23, 25
BG 01, 02, 10
R 30
E 41, 43, 44

I'd like to enter my card in the following challenges :

The Sketchy Challenge : Sketch
7 Kids Challenge : Anything Goes
Simon Says Stamp : Anything Goes

Thanks for dropping by today :)

Kathy


Thursday, April 27, 2017

Strike 2


I have another card for Anna's Craft Cupboard to share using the MFT Strike Up The Band stamp set.
I do Love these bunnies!  They are just so cute aren’t they?!


This time I’ve teamed them with papers from the Doodlebug Designs Spring Things range.
I thought this stripe from the Frog Friends paper was gorgeous and so I coloured the bunnies to coordinate with it.

Then I cut them out using the Strike Up the Band Die-namics die and mounted on foam mounting squares for some added dimension.

There are so many wonderful sentiments that come with the bunnies but I decided to cut the Happy Birthday Sentiment from the Baby Blooms paper.  I attached this at a slight angle so that the bunnies are walking downhill and it gave the card a little extra “something”. 

I always adhere my card and papers with Mono Multi Liquid Glue.  It is very easy to use and stays put.  You also have some wriggle time if you need to change something.

I also used the coordinating Doodlebug matte sprinkles - dots.  I’ve never used matt dots before and I think they look fantastic!  I will definitely be getting more. Love them!

The green matt is American Crafts Key Lime card .
And I used the Kaisercraft C6 white card for the base and rounded the bottom corners.
I also cut another of the C6 cards to make the panel the bunnies are marching on.  Just so it would be the same colour white card.


Copics used :

E 41, 43, 44
BV 0000, 000, 00
Y 11, 13, 15
BG 11, 15
R 30
YG 11, 13, 17
W 00, 1

Colouring these adorable bunnies and making this card was lots of fun.

Thanks for dropping by today :)

Kathy


Tuesday, April 25, 2017

Strike Up The Band

I have some exciting news to share!!!
I am now designing for Anna's Craft Cupboard! :)

I got to play with the adorable stamp set Strike Up The Band by My Favourite Things.  How lucky am I?!!!

I just LOVE this set SO much!!!  These bunnies are super cute and so fun to colour and play around with. The set comes with lots of fabulous sentiments and they can be used for so many different occasions.

I also used the MFT Strike Up The Band Die-namics Die which makes things so much quicker and easier when you have a lot of images to cut out.


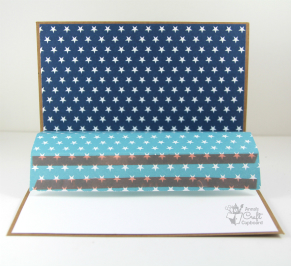
I wanted to make giving a gift card a bit more special, so I made this Pop Up Gift Card Holder.

These are the instructions if you’d like to give it a try J


  • ·         Cut 2 pieces of paper 4 x 5.5” and score at 1,2 and 3” on the short side.
  • ·         Apply strong adhesive tape on the 1” sections on the correct side of the paper at the top and bottom of one piece.


  • ·         Attach this scored piece to inside of card aligning at centre score line. (Mine is attached to bottom of dark star piece)


  • ·         You are folding this over and around to make a little “step”.


  • ·        Align other end of scored piece at centre of card base and adhere to other half of card. (Mine is attached to top of white piece).

  • This is how it should look from the side.


·       
  •     On the second piece of paper, only attach approx. 2cm of tape at top and bottom of one edge. And then attach tape to top and bottom of other edge as in previous piece.


  • ·         Attach this scored paper (the edge with the 2cm tape on it) to the front of first attached piece aligning at base.


  • ·         Then fold over and align end of scored piece at base and adhere to card base. (Making a second “step” which is attached to the first).
       The gift card slots in between the 2 steps.


The pop up holder is now complete and ready to decorate J


I coloured the rabbits and used the dies to cut them out.
This is such a time saver and they look neater too!!!

And for the rabbits on the inside of the card I cut out an extra rabbit shape from white card and attached it to the back of the coloured bunnies.  It looks neater and gives them a little extra strength and support to stand up smartly.

The inside sentiment is a stamp from the Strike Up The Band set and so are the drum and trumpet.

The card does end up being a little bulky because of the gift card and all the fun stuff happening on the inside of it J.  So it is best to tie it closed somehow.  You could tie a nice bow with ribbon or use a belly band but I’ve just tied mine with some twine.


Copics used :

E 41. 43
W 00, 1, 5, 7
Y 11, 15, 28
R 27, 29, 30, 59


I hope you’ve enjoyed this tutorial J

I'd like to enter my card in the following challenges :

Pile it on : Interactive and/or Birthday
Word Art Wednesday : Anything Goes
Aud Sentiments Challenge : Use a stamp for your sentiment
Sweet stampers challenge : Animals


And you definitely must check out the My Favourite Things section at Anna’s.  There are just so many CUTE and FUN things to play with!


Thanks for dropping by today :)

Kathy

Thursday, April 13, 2017

Balloon Lucy

I coloured up the gorgeous  Balloon Lucy by CC Designs and created a clean and simple card with her.

I decided to go bold and bright and I really like the way it turned out :)


I also stamped one of the sayings from the Birthday Wishes Sentiments next to her and I used the
Rectangles #1 Die to cut it out.
After I had done that though, I decided that I actually wanted a skinnier rectangle, so I cut off the sides.  I really like the look of the stitching just at the top and bottom anyway :)

Ingredients
Stamps : Balloon Lucy, Birthday wishes sentiments
Card : x-press it, slate, grey, bella Blvd stars
Ink : memento black
Other : rectangles #1 die, copics

Copics used :
RV 23, 25
YR 14, 16, 18
W 00, 1, 3, 5, 7
Y 15
R 30
E 000, 00, 21

I would like to enter my card in the following challenges :

Ribbon Girl : Anything Goes
Word Art Wednesday - Anything goes with a sentiment


Thanks for dropping by today :)

Kathy


Monday, April 10, 2017

Party Kitty

I have been making a lot of bold and bright cards lately
but I have a very soft and sweet card to share with you today.

This is Party Kitty  from the newest release at CC Designs.
I love this little cutie :)


I like to colour balloons with soft colours and make them appear translucent.
And I was happy how this bunch of balloons turned out.
I then spronged on a cloudy sky, cut the piece into a rectangle and sponged some linen distress ink around the edges.
Then I mounted it onto the Scalloped Rectangles Die.

Ingredients :

Stamps : Party Kitty
Card : x-press it, kraft card, blushing bride core-dinations
Ink : memento black, antique linen DI, pool party
Other : Scalloped rectangles die, sweet die (Whimsy), music ef. (Spellbinders)
copics

Copics used :
Y 11, 13
YR 14
YG 0000, 01
R 0000, 00, 30
BV 0000, 00
BG 0000, 000, 10
E 41, 43


I'd like to enter my card in the following challenges :

Simon Says Stamp - Happy Birthday
Ribbon Girl - Anything Goes
Stamping Sensations - Anything Goes

Thanks for dropping by today :)

Kathy


Friday, April 7, 2017

Candle Blowing


Today is RELEASE DAY for the new APRIL Stamps at C.C. Designs. As you have seen from our Preview Days, these new stamps revolve around birthday parties and celebrations!


Isn't this a fabulous release?!  I love them all!
But I've used Candle Blowing today and she is a real sweetie!


I coloured her with copics (which was lots of fun) and decided that she would look great with the phone from the  Make a Card #4 Die.

The sentiment and other embellishments (star, balloon, streamers, base layer) are from the Make a Card #14 Die.


Every release we will have a New Release Blog Hop to showcase our awesome Design Team. Check out their amazing creations! This month we have an awesome Guest Designer joining us! Please give a warm welcome to Mindy Baxter of My Creative Scoop!


And we can’t have a Blog Hop without a PRIZE!! Here's how to enter:

Leave a comment on each DT Member’s Blog, and then head back to the C.C. Designs Blog to let us know you completed the hop. The winner from the Blog Hop will receive FREE stamps!!

*This Blog Hop will end on Sunday, APRIL 9th at NOON, 12pm EST. All winners will be announced the following week.

Don't forget we also have a give-away on the C.C. Designs Facebook Page. Head over, find the Preview Day Banner, and answer the question in the FACEBOOK comment section. You have until Sunday, APRIL 9th to leave an answer for a chance at winning! 

All of these products are now available in the C.C. Designs Store!

Thanks for dropping by today and Happy Hopping!!

Kathy

Wednesday, April 5, 2017

Balloon Boy

It's nearly time for another fabulous release of stamps at CC Designs!
The Design Team are showcasing Roberto's Rascals stamps today and I'm giving you a sneak peek of this gorgeous little guy.
This is Balloon Boy.
And I love him so much!  Isn't he the cutest?!


I coloured this cute stamp with Copics and cut it out.
Then I created a background for him using watercolour paper and various Distress Inks, water splodges, flicks of white paint and some black enamel accents.
And I was really happy with how it turned out :)
I used the Make a Card #6 Die to cut a tag out of it.
And I decided to keep the card clean and simple to keep the focus on Balloon Boy and the tag.

The white piece was cut out using the Make a Card #14 Die
and I also used the Birthday Wishes Sentiments Stamp Set.

Copics used :

Y 13, 15
YG 01, 11, 13
R 00, 22, 24, 27, 30
E 00, 21
BV 00
B 0000, 00, 37, 9, 93, 95, 97
W 3, 5, 7

I'd like to enter my card in the following challenges :

Addicted to CAS : Smile
Simon Says Stamp : Anything Goes
Word Art Wednesday : Anything Goes


You can see some more sneak peeks by the Design Team at the CC Designs blog.
And please drop by again tomorrow for the new release Blog Hop.

Kathy :)