Pages

Showing posts with label make a card #4 die. Show all posts

Friday, July 7, 2017

Rockabilly Gals

I'm back with another of the super cute Rockabilly Gals from CC Designs today :)

This one is just so adorable!

I took inspiration from this camera paper.
I coloured her to match and imagined she was having her photo taken :)


Ingredients :

Stamps : Rockabilly Gals, Rockabilly Sentiments
Card : x-press it, slate, sky, totally rad (cocoa vanilla)
Ink : memento black, versafine black, pool party
Other : MAC #4, MAC #14, copics

Copics used :

E 000, 00, 21, 53
BG 09, 10, 11, 72
YG 0000, 01, 03
Y 15
W 00, 1
YR 14, 16, 18
R 30

Thanks for dropping by today :)
Kathy

Wednesday, July 5, 2017

Rockabilly Gals Record

I have a card for CC Designs to share with you today.
This cutie is from a new set by Roberto's Rascals called Rockabilly Gals.
There are 4 gals in the set and they are all gorgeous :)


I wanted to create a record for the card and I did this simply by using some circle dies.
And I decided to use a sentiment from the new Rockabilly Sentiments set for the "song title".  It is actually a long sentiment but I cut it into these three segments to make stamping on the record label easier.

I coloured her with Copics and added some pencil colouring to it also.

Ingredients :

Stamps : Rockabilly Gals, Rockabilly Sentiments, Aphrodite Twila (heart notes)
Card : x-press it, black, grey, red, slate
Ink : memento black, white, versamark, versafine black
Other : Circle Dies #1, MAC #4 die, white ep, copics, pencils

If you head over to the CC Designs Blog you will see some beautiful cards by the Design Team.
And if you leave a comment, you may even be lucky enough to win this set!


Thanks for dropping by today :)
Kathy


Friday, April 7, 2017

Candle Blowing


Today is RELEASE DAY for the new APRIL Stamps at C.C. Designs. As you have seen from our Preview Days, these new stamps revolve around birthday parties and celebrations!


Isn't this a fabulous release?!  I love them all!
But I've used Candle Blowing today and she is a real sweetie!


I coloured her with copics (which was lots of fun) and decided that she would look great with the phone from the  Make a Card #4 Die.

The sentiment and other embellishments (star, balloon, streamers, base layer) are from the Make a Card #14 Die.


Every release we will have a New Release Blog Hop to showcase our awesome Design Team. Check out their amazing creations! This month we have an awesome Guest Designer joining us! Please give a warm welcome to Mindy Baxter of My Creative Scoop!


And we can’t have a Blog Hop without a PRIZE!! Here's how to enter:

Leave a comment on each DT Member’s Blog, and then head back to the C.C. Designs Blog to let us know you completed the hop. The winner from the Blog Hop will receive FREE stamps!!

*This Blog Hop will end on Sunday, APRIL 9th at NOON, 12pm EST. All winners will be announced the following week.

Don't forget we also have a give-away on the C.C. Designs Facebook Page. Head over, find the Preview Day Banner, and answer the question in the FACEBOOK comment section. You have until Sunday, APRIL 9th to leave an answer for a chance at winning! 

All of these products are now available in the C.C. Designs Store!

Thanks for dropping by today and Happy Hopping!!

Kathy

Thursday, August 6, 2015

Devilish Nancy


Hi

It's time for a new release at CC Designs :)
And this stamp called Devilish Nancy is so cute!

It would make a wonderful Halloween stamp of course but as I don't celebrate it, I decided to create a Wicked Birthday card instead :)


I made the sentiment by using the Pollycraft Super Duper Sentiments set.  I just took the "awesome" out and the "n" in "an" .  And I used the CC Designs Mini Alpha and Numbers Die to make the word "Wicked".

*New Pollycraft Super Duper Sentiments Rubber Stamp

I used a new product too.  CC Designs now make their own Dots - and I LOVE them!
These are from the Princess Enamel Dots set.

Ingredients :

Stamps : Devilish Nancy,  Super Duper Sentiments
Card : x-press it, red, black, SU dsp
Ink : memento black, versafine black
Other : CC Designs Mini alpha and numbers die, Make a card #4 diePrincess Enamel Dots, copics

Copics used :

R 20, 24, 27, 29, 30, 59
E 000, 00, 21
W 1, 5, 7, 9

I'd like to enter my card into the following challenges :

Papertake Weekly - anything goes
Stamp and Create - one for the girls

Thanks for dropping by today :)

Kathy

Thursday, April 16, 2015

Baker Nancy

Hi :)

I have another card to share featuring a new Roberto's image for CC Designs.  This is Baker Nancy and she is SO cute!  I LOVE her and the cake is pretty wonderful too!

cc designs, Baker Nancy, pierced rectangles die, HB2U sentiments

The sentiment is from a new CC Designs set also, called HB2U Sentiments.  There are heaps of great birthday greetings in it, but this one just felt right. I also decided to add some music notes to add to the party atmosphere.
It was lots of fun to colour this one up!

Ingredients :
Stamps : Baker Nancy, HB2U Sentiments
Card : x-press it, black,  Vintage Summer    (little yellow bicycle)
Ink : memento black
Other : By DIEzyne Big stitched and pierced rectangles die, Frilly banner die, make a card #4 die, copics

Copics used :
E 000, 00, 21, 31, 33, 35, 39, 50, 53, 55
R 000, 24, 29, 30, 81, 85
RV 21, 23
YR 16
G 82
Y 11
B 0000, 93, 97
BG 0000
C 1, 3, 5


I'd like to enter my card into the following challenges :
Crafty Calendar Challenge - Add a sentiment
Scribble and Scrap - Anything Goes
Marker Pop - Anything Goes


Thanks for dropping by today :)

Kathy


Tuesday, March 10, 2015

Carrot Love Easter Gift

Hi :)

I have a little Easter treat to share with you today using another new CC Designs image.

Sorry I can't actually share the eggs with you though, I bought a whole bucket of M&M's eggs to make this gift for a neighbour.  I had bought a big bucket so that I could make more than one but that didn't happen. My girls and I just ate what was left over (which was a lot)!  :)


cc designs, carrot love


Anyway, I found this square plastic milk bottle at a cheap store and thought it would make a cute little Easter gift. I filled it with eggs and decorated the front with the adorable Carrot Love stamp.
I cut out a kraft tag using the By DIEzyne Pierced Tickets Die and used white craft ink to make the background with the CC Designs Dot Stencil. I cut a circle out of the same card to decorate the top of the lid too.
The Happy  Easter is from the new Amy R Hopped Up sentiment set and I cut it out using the Make a Card #4 Die.

Thanks for dropping by today :)

Kathy


Monday, February 16, 2015

iphone wallet card tutorial


Hi :) I have a tutorial for CC Designs to share with you today using the fabulous CC Designs Cutters Make a Card #4 Die.

I had the idea to try creating a copy of my iphone wallet case.  I knew if I could get it to work it would be a great gift card holder because my case has little slots inside for cards.
So this is my real phone and case and my copy.  I'm really pleased with how it turned out :)
Here's how I did it :


IMG_0511

Firstly cut a piece of cardstock approx 5 3/4  x 5", score in half and position largest rectangle die off folded edge as shown and diecut.
IMG_0493
Cut another 2 large rectangles from card. Cut 1 end off so that it is 3 1/2" long and cut end off other rectangle so that it is 3 3/4" long.  Then cut off 1 side edge of both so that they are 2 5/8" wide.


IMG_0495

Diecut another large rectangle and cut off 1 end so that it's 1 3/4" long. Score it at 5/8" and 6/8" with straight edge against score board.  Repeat this step with patterned paper.


IMG_0497
I then used the 1 1/2" rectangle to cut adhesive metal sheet (for "clasp"). Score it at halfway lengthwise.
Adhere the 2 trimmed rectangles to the inside of "case". I decided to leave the edges near the middle open for ease of getting cards in and out.  They fit snuggly and there is no chance of them moving. 


IMG_0504
With the smaller cut rectangle and matching patterned paper one, I adhered a magnet (Basic Grey Magnetic Disc = WONDERFUL!) to the cardstock and then adhered the patterned paper rectangle over the top of it. Then attach to the inside as shown.  I then attached the scored "metal" paper to this for the clasp.
IMG_0507
I attached another magnet to outside of case and used a little distress ink around the edges.
IMG_0508

For the "phone", I used white gloss card for a bit of extra realism, but ordinary white would work too. These are the dies I used to create it: This time using the second largest rectangle, so that phone is slightly smaller than the case.


IMG_0501

You could cut your stamped image out using the same size rectangle die as the phone or just cut a small rectangle to fit behind the "window".
I also cut a piece of acetate to place over the top of my stamped image and behind the window.  It made it look more like a phone screen but if you don't have any, you don't really need it :)  I used pop up adhesive dots to attach the phone to the case.


I had already coloured up this super-cute Pollycraft stamp called Pixie and decided to use it as the image in my phone.  But one of the new teenager stamps would have been really wonderful to use. Or if it ever happens that you're not in a colouring mood, you could use a real photo instead - that would be great too.  I also used a little rectangle and corner rounded it for a sentiment card. I just stamped the birthday sentiment at the top and left the rest blank for a personal message.


iphone card, case, wallet, cc designs, Pixie, tutorial

This was easy to make and is a great, fun way to give a gift card.  I hope you'll give my iphone wallet card a try :)

Thanks for dropping by today :)

Kathy


Thursday, February 5, 2015

Shopping Erica


Hi :)  It's the second day of Previews for CC Designs.
And there are 10 new Roberto's images that are all about teens.

I don't think this one would necessarily need to be for a teen though.  She's just pretty!
The stamps called Shopping Erica.

Shopping Erica, CC Designs, Roberto's, Make a Card #4 Die

I used a new die too called the Make a Card #4 Die.
The paper (including the butterflies) is from an absolutely gorgeous pad by Maja Designs called Vintage Spring.  I have never used Maja Designs paper before and WOW - I Love It!!!

I coloured her with my copics in colours to match the beautiful paper and just used a little antique linen distress ink around the edges.

Ingredients :

Stamp : Shopping Erica
Card : x-press it, vanilla, sky, Vintage Spring (Maja Designs)
Ink : memento black, antique linen distress ink
Other : Make a Card #4 Die, copics

Copics used :

E 000, 00, 21, 33, 35, 39
YR 14
W 00, 1, 3
G 21, 82, 85
BG 0000
R 30
RV 0000
V 91, 93, 95, 99

All the new stamps and dies will be ready to buy from CC Designs tomorrow but in the meantime please take a look at all the wonderful creations  by the DT on the CC Designs Blog.

Thanks for dropping by today :)

Kathy

Wednesday, February 4, 2015

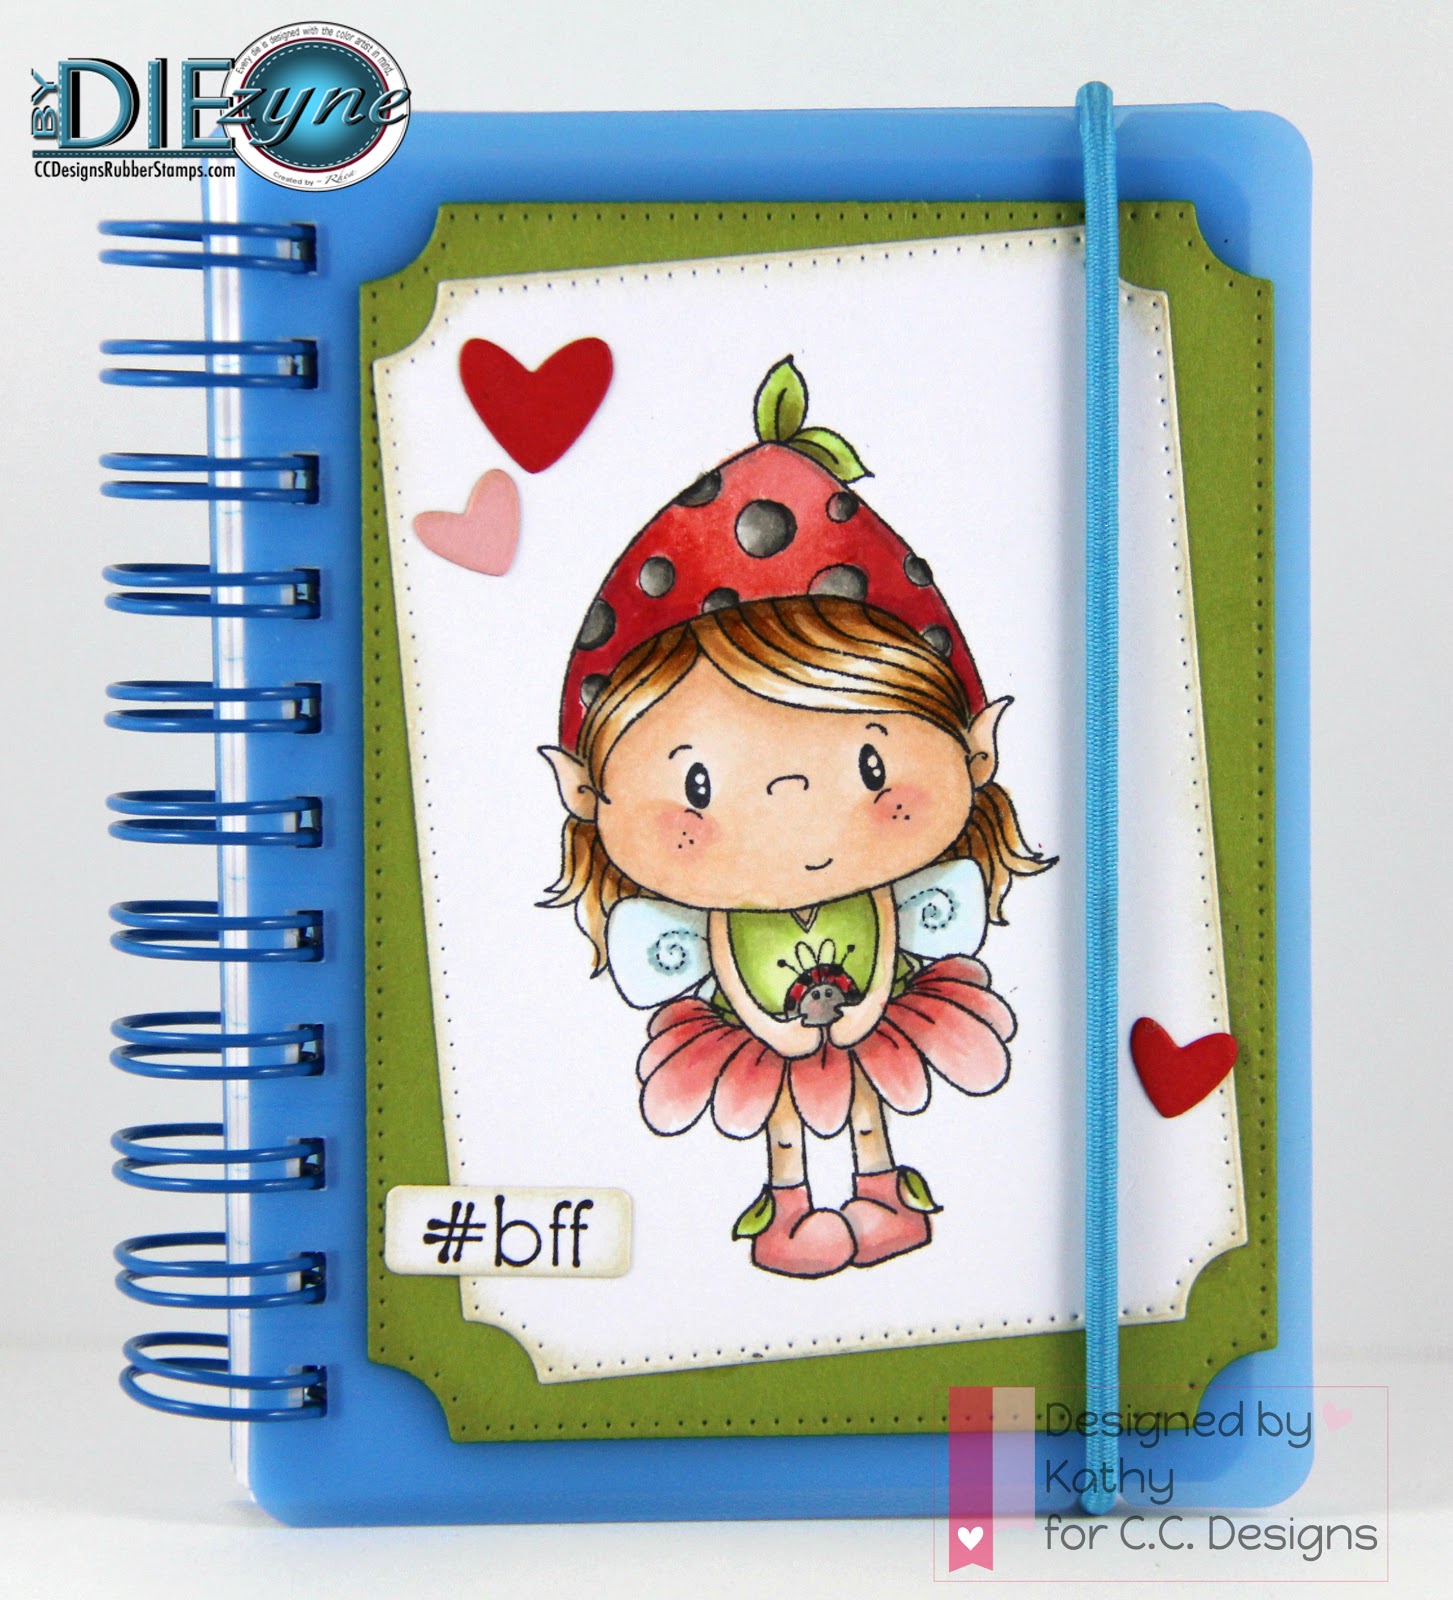
Elfie

Hi :)
It's Preview Time at CC Designs again !

Today the Design Team are showcasing the new CC Designs and Pollycraft images.

I decided to use this cutie from Pollycraft called Elfie.

CC Designs, Elfie, Pollycraft

Instead of making a card, I decided to decorate a cute (but cheap) little notepad.
My youngest daughter had a birthday party to go to and we had bought the birthday girl some pretty pens. So I thought a cute handmade notepad would be a great gift to go with it.  She absolutely loved it too - which was nice :)

Ingredients :

Stamps : Elfie, Rumor has it
Card ; x-press it, poppy, blush bride, limeaide
Ink : memento black, antique linen distress ink
Other : Make a card #2 Die, Make a card #4 Die, Pierced Tickets Dies, copics


Copics used :

W 1, 3, 5, 9
E 000, 00, 21, 50, 53, 55
YG 0000, 03, 91, 95
R 20, 24, 29, 30
BG 0000, 72

Please take a look at what the rest of the Design Team has to show you on the CC Designs Blog.
And thanks for dropping by today :)

Kathy