
I have used the fabulous Party Like a Pirate stamp set by My Favorite Things again.
There are just so many cute images in this set that I wanted to make a little scene with them. A fun way to do this is by making a Pop-Up Box Card.
The MFT stamp sets are all really great for this type of card because there are always a lot of different images in each set. And you can also incorporate stamps from other sets too as they coordinate so well together.

Here's how I made my Pirate Pop-Up Box Card if you'd like to give it a try :)
Ingredients:
American Crafts Smooth Kraft Card
Ruby Rock-It Bella iWood version 1.0
Tombow Mono Multi Liquid Glue
MFT Die-namics Die - Spring Scene Builder
Distress Ink - Antique Linen
X-Press it - High tack double sided tape
MFT Party Like a Pirate stamp set and die
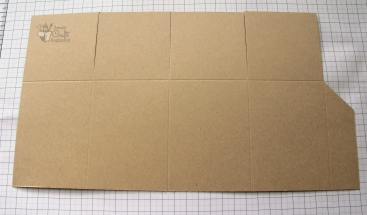
Step 1 : Cut card 8.5"x 12". Then score the long side at 2.75", 5.5", 8.25" and 11".
Cut off a 12"x 2" strip (to be used later).

Step 2 : Score along short side of 6.5"x 12" piece at 2.75"
Step 3 : From long side, cut down to this 2.75 score line on each of the 4 score lines.
At 11" score, cut in at a slight angle to create a tab.
Step 4 : Cut the 2"x 12" piece at 4.75" from the end with the 1" score line.
Then cut the strip in half lengthwise to create 2 strips 4.75"x 1".
Step 5 : Fold both tabs back.

Step 6 : Cut patterned paper to fit on each panel and adhere. Adhere longest pieces to panels next to the tab.
You will need:
1 Inside back panel 2.5"x 6.25". (I used blue card for mine and decorated it with a couple of die cut clouds from the Spring Scene Builder Die and sponged around edge with ink).
3 Lower panels 2.5"x 3.5" (for outside of box)
6 Upper panels 2.5" square (inside and outside)
1 2.5"x 6.25" outside back panel (white card, to write message on).

Step 7 : Put adhesive on tab and fold card to form box and adhere.

Step 8 : Add adhesive to end tabs of 1"x 4.75" strips and adhere to inside of box. Align them with the top. Both tabs ends towards outside front or back.

The pop-up box is now built and ready to decorate :)

I coloured all my images with copics and cut them out with the co-ordinating die. This saves so much time when making something with this many individual stamps!
The images are adhered to the strips of card inside the box but it can be hard to visualise where you want to place them. I find it best to put dabs of Tombow Mono Multi Liquid Glue near the bottom of the images and leave them for a while to "set". Then the glue is repositional! You can move them over and over while you're trying to decide on the best placement and this makes me very happy :)
Once I'd decided where they looked best, I did take them off and add some more glue to the bottom as normal, and stuck them down again, just to make sure they would "stay put".
You can see from the above photo that I glued some images to both strips and added more to the back panel also.
On the first strip I added some images along the entire front, overlapping them slightly.
On the second strip I stuck the girl pirate to the front but then stuck the island to the back of it, for a little extra dimension. I also cut out the Ahoy Mate sentiment and glued it and the parrot to a thin piece of acetate and stuck it to the back of this strip with X-Press It tape. From a distance this looks as though it is "floating" in the air (or that the Parrot has flown off with a sign) :)
It would be best to create the very back piece right at the beginning, before you even stick it onto the box. I had glued on the clouds from the Spring Scene Builder Die and thought that would be enough, but then I decided that I wanted to add the pirate ship. And after that I thought it maybe needed a couple of waves too! I don't really have a wave die, but I improvised by using the stream also from the Spring Scene Builder Die.
You don't really see the entire ship, but everything is placed on this card to add extra depth and dimension to the scene.

I hope you enjoyed my tutorial and will try making a Pop-Up Box Card too :)
Kathy
Shiver me timbers but this is cute! Great tutorial too.
ReplyDelete