Pages

Showing posts with label MFT Spring scene builder die. Show all posts

Friday, September 22, 2017

Wild About You


I have a post for Anna's Craft Cupboard and a handmade gift rather than a card to share with you today :)

But firstly I'd like to tell you a little about a new tool I bought a few weeks ago, the Tim Holtz Stamp Platform.


I had read quite a bit about it before buying it and it definitely lives up to the hype.
It is absolutely wonderful!
I have only had it a few weeks but I feel like it's an essential tool now.
I will never stamp without it again!
And I wonder how I ever did without it!

There are so many great things about this stamp platform but I thought I would write down in no particular order....

 My Top 10 Reasons Why It's Brilliant  

  1. You can stamp and re-stamp until you're satisfied with your stamped image.  This will save SO much paper.  No more throwing away images and cards because you're not happy with how they've stamped.
  2. You can use it with rubber and clear stamps.  You simply turn the lid over which is really quick and easy. "Rubber" and "clear" is marked on the lid.
  3. The top has an easy to see grid moulded into it which lets you position stamps more easily and allows for perfect placement. This is particularly great with clear stamps if you are using letter stamps, sentiments or are trying to get something in a straight line for example.
  4. It's very sturdy and well made and easy to clean with a baby wipe.
  5. Measurements along the top and side in metric and imperial and these won't rub off.
  6. You can use any size of paper in it!
  7. It's great for hard to ink images like background stamps or other stamps that you have trouble with.
  8. Very easy to use and gives a great image without the need to press down as hard as you do with a block. Fantastic for people with arthritis or other issues with their hands/arms.  Less pressure needed.
  9. Perfect for stamping identical cards, such as invitations or Christmas cards.  
  10. I can finally stamp a sentiment straight onto an almost finished card without ruining the whole thing!!!!! Yay!

If you do any stamping at all, you need one of these!
As you can probably tell, I really, really love mine :)


Anyway, onto the actual project :)

I had the chance to play with a new MFT stamp called Wild About You.
There are 4 different African animals in this fun set and it could be used for so many different types of cards.
But I thought I would use it to make a cute baby gift and instead of buying a gift bag I decided to make my own.
Well, I didn't exactly "make" it to be honest, there was no sewing involved at all.
But I bought this plain calico bag and decorated it :)


I have never stamped on fabric before so I can't speak from experience. But I did some research and found that there are inks specifically for fabric but that you can also use Pigment Inks and heat set them to make them permanent.
I decided to try Brilliance Graphite Black.
I don't think it would matter too much what ink I used though as this is not something that would be washed much anyway.
I could have also coloured the giraffes but I liked the more plain, graphic look.

So here's a little about how I made the bag, if you'd like to give it a try too :)


  • I measured the bag (25x29cm) and cut a piece of paper slightly smaller.  Then I stamped the giraffes in a row as I would on the bag, trying out different spacing until I was happy.  I decided I liked the look of 5 and worked out that I needed to start 1" from the edge and move the piece 1.5" after each stamping.


  • I cut a piece of card smaller than the bag and placed it inside, in case the ink went through onto the other side of the bag.  


  • I wanted the giraffes to be in a line across the bottom of the bag and because of the bag's size it meant I had turn the bag around and have the bottom of it against the top edge of the Stamp Platform.

  • You would also usually put your work into the top left corner of the Platform and hold it in place with the super strong magnets.  But with this bag I had to work from the right hand side instead.  This is because there is a raised edge on the left and top of the Platform whereas the right side and bottom are flat to allow for larger pieces than the platform to be used.

  • I could have kept moving the stamp across the lid instead of moving the bag but then it wouldn't be quite as even and straight along the bottom and you get messy fingers and there's extra cleaning, etc. So it is best to leave the stamp in place and move the bag across.

  • I positioned the stamp where I wanted it on the lid to stamp my first giraffe.  I put the magnets on top and even though they were going through 2 pieces of fabric plus a layer of cardboard, it held it in place easily.  These magnets are very strong and you need to be a little careful with them.  It is best to slide them into place if possible rather than picking them up.


  • I had to stamp, re-ink and repeat to get a good enough image.  This was only because I was stamping onto fabric though. 

  • I took the magnets away and moved the bag across 1.5", replaced the magnets before re-inking and stamping again and repeated until I had my 5 giraffes.


There is no way I would have even thought of attempting this project if it wasn't for my new Tim Holtz Stamp Platform.
The first stamping of each giraffe was very light, even though I used a very juicy ink pad and the stamp platform.  So I had to re-ink the stamp and stamp each one at least twice to get a good image.
And without the stamp platform I wouldn't have been able to do this or line the giraffes up and get them straight either :)


After making the bag I made a tag to match using the MFT Die-namics Blueprints 5 Tag Builder Die.
This die is wonderful and makes the most gorgeous tags!
I do have other tag dies but this one is my new favourite.
It is just so cute!!!

I used American Crafts smooth Kraft card for the base,
Lawn Fawn watercolor wishes paper for the background and I cut the grass using the MFT Spring Scene Builder Die-namics.
The giraffe was coloured with Copics and popped up using X-Press It Foam Mounting Squares.
The little wooden sentiment is from  Jillibean Soup Wordfetti - Celebrate.


I could put various little baby goodies inside the bag but what I intend to do is to buy a board book.
Maybe 'Giraffe's Can't Dance'? That is a great book and fits the giraffe theme perfectly.
And perhaps later on the bag could be kept as a library bag?
It would be just the right size for a toddler and their smaller books and I think it would be very cute too!  :)

Kathy


Sunday, September 10, 2017

Happy Hippos Birthday

I have another card today for Anna's Craft Cupboard featuring those Happy Hippos from MFT :)

This really is an adorable set!
I used a different hippo and bird this time with a birthday cake and I created a little background scene for them too!


I used the MFT Spring Scene Builder Die-namics with papers from Lawn Fawn's Watercolor Wishes pad.  These papers worked so well with this die! They all coordinate beautifully and have light and dark areas of colour, giving them a real watercolour look. Plus there's none of that extra work (and talent) that's needed for painting!  Bonus!

Once I'd created the little background scene I rounded the corners and glued it to a Kaisercraft square white card.
I coloured my images with Copics and cut them out and I used X-Press IT foam mounting squares on the hippo and balloons to make them "pop" and give the card some added dimension.

Thanks for dropping by today :)

Kathy


Sunday, July 30, 2017

Strike Up the Band Thanks

This weekend there is a Cyber Crop happening over on the Anna's Craft Cupboard Facebook Page.
There are lots of different challenges around the theme of "Warm and Cosy".

I decided to challenge everyone to create a Thank You card to warm someone's heart.

Thank You cards are often full of flowers but they don't have to be!
My daughter asked me if I could make her a Thank You card to give to her music teacher so I just had to use the sensational MFT set called Strike Up the Band again :)


I created the background by stamping 3 of the bunnies with versafine black ink onto Kraft card.

I coloured the main bunny with copics and cut him out with the coordinating die.
I white embossed the music notes onto black card and used the grass from the Spring Scene Builder die to cut the key lime card.

The "Thanks" is cut from the Doodlebug Spring Things - Springtime Dots paper.

Please drop by the Anna's Facebook Group and join in this challenge, or just say "Hi".
We'd love to see you there :)

Kathy

Monday, July 17, 2017

Party Like a Pirate Pop-Up Box Card


I have another card and tutorial for Anna's Craft Cupboard to share today :)

I have used the fabulous Party Like a Pirate stamp set by My Favorite Things again.
There are just so many cute images in this set that I wanted to make a little scene with them.  A fun way to do this is by making a Pop-Up Box Card.
The MFT stamp sets are all really great for this type of card because there are always a lot of different images in each set.  And you can also incorporate stamps from other sets too as they coordinate so well together.


Here's how I made my Pirate Pop-Up Box Card if you'd like to give it a try :)

Ingredients:
American Crafts Smooth Kraft Card
Ruby Rock-It Bella iWood version 1.0
Tombow Mono Multi Liquid Glue
MFT Die-namics Die - Spring Scene Builder
Distress Ink - Antique Linen
X-Press it - High tack double sided tape 
MFT Party Like a Pirate stamp set and die

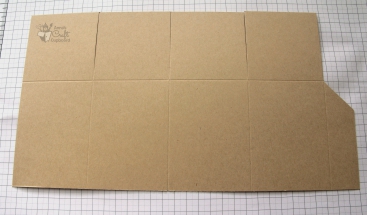
Step 1 :  Cut card 8.5"x 12".  Then score the long side at 2.75", 5.5", 8.25" and 11".
Cut off a 12"x 2" strip (to be used later).


Step 2 : Score along short side of 6.5"x 12" piece at 2.75"
Step 3 : From long side, cut down to this 2.75 score line on each of the 4 score lines.
At 11" score, cut in at a slight angle to create a tab.


Step 4 : Cut the 2"x 12" piece at 4.75" from the end with the 1" score line.
Then cut the strip in half lengthwise to create 2 strips 4.75"x 1".

Step 5 : Fold both tabs back.


Step 6 : Cut patterned paper to fit on each panel and adhere.  Adhere longest pieces to panels next to the tab.
You will need:
1 Inside back panel 2.5"x 6.25". (I used blue card for mine and decorated it with a couple of die cut clouds from the Spring Scene Builder Die and sponged around edge with ink).
3 Lower panels 2.5"x 3.5" (for outside of box)
6 Upper panels 2.5" square (inside and outside)
1 2.5"x 6.25" outside back panel (white card, to write message on).


Step 7 : Put adhesive on tab and fold card to form box and adhere.


Step 8 : Add adhesive to end tabs of 1"x 4.75" strips and adhere to inside of box.  Align them with the top.  Both tabs ends towards outside front or back.


The pop-up box is now built and ready to decorate :)


I coloured all my images with copics and cut them out with the co-ordinating die.  This saves so much time when making something with this many individual stamps!

The images are adhered to the strips of card inside the box but it can be hard to visualise where you want to place them.  I find it best to put dabs of Tombow Mono Multi Liquid Glue near the bottom of the images and leave them for a while to "set".  Then the glue is repositional! You can move them over and over while you're trying to decide on the best placement and this makes me very happy :) 
Once I'd decided where they looked best, I did take them off and add some more glue to the bottom as normal, and stuck them down again, just to make sure they would "stay put".

You can see from the above photo that I glued some images to both strips and added more to the back panel also. 
On the first strip I added some images along the entire front, overlapping them slightly.
On the second strip I stuck the girl pirate to the front but then stuck the island to the back of it, for a little extra dimension. I also cut out the Ahoy Mate sentiment and glued it and the parrot to a thin piece of acetate and stuck it to the back of this strip with  X-Press It tape. From a distance this looks as though it is "floating" in the air (or that the Parrot has flown off with a sign) :)

It would be best to create the very back piece right at the beginning, before you even stick it onto the box.  I had glued on the clouds from the Spring Scene Builder Die and thought that would be enough, but then I decided that I wanted to add the pirate ship. And after that I thought it maybe needed a couple of waves too!  I don't really have a wave die, but I improvised by using the stream also from the Spring Scene Builder Die. 
You don't really see the entire ship, but everything is placed on this card to add extra depth and dimension to the scene.


I hope you enjoyed my tutorial and will try making a Pop-Up Box Card too :)

Kathy


Friday, June 23, 2017

Up in the air


I have another card and tutorial for Anna's Craft Cupboard today.
And I’m showcasing another fabulous stamp set from My Favorite Things (MFT) .

I got the chance to play with Up In The Air this month and it is so much fun to use.
There are just SO many possibilities with this set!  The sky is the limit! :) (ha ha)

I was also lucky enough to get the MFT Die-Namics Die - Spring Scene Builder to use and it is wonderful too :)

So I wanted to use these two together and create an interesting sky for the balloon to float around in.
I decided to create a sun ray background with patterned papers (AKA the Sunburst or Starburst technique).  
Here is how I created my card so that you can try it out for yourself :)


This technique can be wonderful for using up scraps of patterned paper you have in your stash.  You can use all different lengths, widths and designs and make them work.  But I actually cut mine from 2 new sheets of paper and cut them all the same size :)

When using this technique you need to firstly decide where you want the “rays” to radiate from.  I decided to put my sun in the top right hand corner of the card, so all the points of my rays start there.

I also decided to leave a space between my rays, but you can vary the look of the background by butting them together instead.

I used Spring-a-ling and Butterfly Net from the Spring Things  collection by Doodlebug Designs to make the rays.
·        I used a Kaisercraft C6 White Card for the base.

·        I cut a piece of white card 4”x 5 7/8”. This is the piece you will glue the rays to.

·        Then I cut 5 rectangles from patterned paper 1”x 6”.
(I cut 2 rectangles from one colour and 3 from another).
·        Then cut them in half diagonally.


·        I glued 1 ray along one edge, making sure the point of it was in the top corner of the card.


·        Then I glued a second ray along the other side.


·        I glued the other rays between these two, leaving a little space. They may overlap a little at the points or not be perfect but this is fine as it will be covered over.


·
·      Turn the card over and carefully trim away the excess paper.  I found this easier to do by hand, but you can use a paper trimmer.


You will notice some pieces are not quite long enough.  That is okay because I am putting some grass on the bottom of the card.


·        I cut the sun and clouds with the MFT Die-Namics Die - Spring Scene Builder.  I added some ink to the sun and glued it over the top of the sun rays at the right corner of the card.


·        I white embossed the cute sentiment from the Up In The Air set onto a piece of American Crafts – Key Lime Card. I used the hill piece from the die to cut it out and trimmed it down to fit.  Then I inked the edge of it and attached it to the bottom of the card.


·       There are trees with the die too, but I decided to colour the trees from the stamp set and cut them out and attached them to the hill.

I didn’t get the matching outline die with this stamp so I thought I would show you how I cut out the balloon too. (I guess this is just for people like me who don’t like to cut images out with a knife.)


Maybe you noticed something a bit wrong with this photo? Were you wondering why a dog has suddenly appeared?

Well I had my card all laid out just how I wanted it ready to be glued down when my daughter came in.  So I asked her what she thought of the card and she said “I really love it but there is one thing that would have made it perfect”. 
So I had to ask …. “What?”  And she said ……         
“The CAT”!
So I just had to colour up the cat and swap that puppy out of there so that my card would be perfect! :)

The dog is very cute too though and I will be back here on the blog later this week to show you how I used him on another card.  I hope you’ll come back to see. :) And in the meantime, please check out all the wonderful MFT goodies at Anna’s Craft Cupboard.

Kathy