I have some exciting news to share!!!
I am now designing for Anna's Craft Cupboard! :)
I got to play with the
adorable stamp set Strike
Up The Band by My
Favourite Things. How lucky am I?!!!
I just LOVE this set SO much!!! These bunnies are super cute and so fun to
colour and play around with. The set comes with lots of fabulous sentiments and
they can be used for so many different occasions.
I also used the MFT
Strike Up The Band Die-namics Die which makes things so
much quicker and easier when you have a lot of images to cut out.
I wanted to make giving a gift card a bit more special,
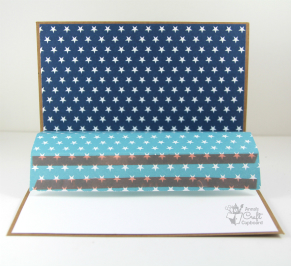
so I made this Pop Up Gift Card Holder.
These are the
instructions if you’d like to give it a try J
- · I used a Kaisercraft C6 Kraft Card as the base.
- · Cut 2 pieces of paper 15 x 10.5cm and attach to inside of card. I’ve used gorgeous papers from the Bella Blvd Oh My Stars range. I used white on the bottom section so that I could write a sentiment there. (I used a piece cut from a Kaisercraft C6 white card.)
- · Cut 2 pieces of paper 4 x 5.5” and score at 1,2 and 3” on the short side.
- · Apply strong adhesive tape on the 1” sections on the correct side of the paper at the top and bottom of one piece.
- · Attach this scored piece to inside of card aligning at centre score line. (Mine is attached to bottom of dark star piece)
- · You are folding this over and around to make a little “step”.
- · Align other end of scored piece at centre of card base and adhere to other half of card. (Mine is attached to top of white piece).
- This is how it should look from the
side.
·
- On the second piece of paper, only attach approx. 2cm of tape at top and bottom of one edge. And then attach tape to top and bottom of other edge as in previous piece.
- · Attach this scored paper (the edge with the 2cm tape on it) to the front of first attached piece aligning at base.
- · Then fold over and align end of scored piece at base and adhere to card base. (Making a second “step” which is attached to the first).
The pop up holder is now complete and
ready to decorate J
I coloured the rabbits and used the
dies to cut them out.
This is such a time saver and they
look neater too!!!
And for the rabbits on the inside of
the card I cut out an extra rabbit shape from white card and attached it to the
back of the coloured bunnies. It looks
neater and gives them a little extra strength and support to stand up smartly.
The inside sentiment is a stamp from
the Strike Up The Band set and so are the drum and trumpet.
The card does end up being a little
bulky because of the gift card and all the fun stuff happening on the inside of
it J. So
it is best to tie it closed somehow. You
could tie a nice bow with ribbon or use a belly band but I’ve just tied mine
with some twine.
Copics used :
E 41. 43
W 00, 1, 5, 7
Y 11, 15, 28
R 27, 29, 30, 59
I hope you’ve enjoyed this tutorial J
I'd like to enter my card in the following challenges :
Pile it on : Interactive and/or Birthday
Word Art Wednesday : Anything Goes
Aud Sentiments Challenge : Use a stamp for your sentiment
Sweet stampers challenge : Animals
I'd like to enter my card in the following challenges :
Pile it on : Interactive and/or Birthday
Word Art Wednesday : Anything Goes
Aud Sentiments Challenge : Use a stamp for your sentiment
Sweet stampers challenge : Animals
And you definitely must check out the My
Favourite Things section at Anna’s. There are just so many CUTE and FUN things to
play with!
Thanks for dropping by today :)
Kathy


This is such a wonderful card.
ReplyDeleteThe card would also fit perfectly to our challenge at the Sweet Stampers.
Check it out :-)
http://sweetstamperschallenge.blogspot.de/
Your card is fantastic, great design and i love the Bunnys.
ReplyDeleteThank you for joining us at the Sweet Stampers Challenge and i hope to see you again.
Hugs
Kuni
Super gemacht.
ReplyDeleteDanke daß du bei den Sweet Stampers mitmachst.
LG Dreja
Wow oh wow oh wow!! I love these bunnies but you have created something really amazing with them Kathy - LOVE this! Thank you for sharing how to make the pop up, I need to try this! Hugs xx
ReplyDelete